Configuration Manager

OneDrive for Business Next Gen Sync Client ConfigMgr Detection Method

Recently the OneDrive for Business Next Generation Sync Client was released. This new client brings the OneDrive sync feature out of the Office suite and into a standalone product. I'm not sure if it supported by Microsoft, but you can have both the Office integrated OneDrive for Business client and this new Next Gen client running at the same time. One of the key features missing from the Next Gen client is that you can't sync a SharePoint library using it. You can read all about the features and nuances of the client in Microsoft's post.

The installation files can be downloaded from this site http://go.microsoft.com/fwlink/p/?LinkId=248256.

Detecting the install

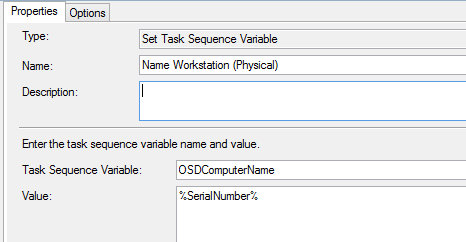
The installation for the new client is pretty straight forward so I'm not going to go into detail there, create a new Application, select a script type installer and run "OneDriveSetup.exe /silent" as your Installation Program. In my testing I was able to get the new client installed without any trouble (I tested on Windows 7 only, I'm not sure if my results are applicable to Windows 8, or Windows 10) using "OneDriveSetup.exe /silent" as my installation command line. You'll notice that this installation does not require administrator rights to run, nor does it show up in Add/Remove Programs. Instead the OneDrive application is installed to the user profile directory of which ever user ran the installation, it installs to %LOCALAPPDATA%\Microsoft\Onedrive\ , this also means that the installer will need to be run for each user who logs into the computer that wants to use this version of OneDrive. Given this information I thought I could use a file type detection method by using the path of %LOCALAPPDATA%\Microsoft\Onedrive\ and file name OneDrive.exe.

Seems simple enough, right? However this ends up with a failed install. Why? Because this detection rule runs in System context, regardless if you chose the "Install for User" or "Install for System" installation behavior. I was stuck on this for a while, after some searches I found that others have run into similar issues and discovered that if you run a script based detection method that it runs in the user's context if you choose install for user. I then configured a PowerShell script based detection method and used the command "Test-Path $env:LOCALAPPDATA\Microsoft\Onedrive\OneDrive.exe".

This cleared up the detection issue I was having and I was getting successfully installations when installing from the Application Catalog.

This by no means a comprehensive way to deploy the new OneDrive client, you might want to do some things like remove the old client, prompt your users to log into Office 365, or other things that would smooth the transition from the previous OneDrive client to the Next Gen client.


Dynamically Set Hostname in SCCM Task Sequence

You may be in a situation where you need to dynamically set the hostname of a machine as part of your SCCM task sequence. For a zero touch deployment you'll want to use a method that requires no interaction. In my experience I've found that using the serial number of the machine provides a decent unique string. 

A note about Windows hostname length. On some forums the maximum size of a Windows hostname is a debate, however I find it best to stick to what Microsoft has published on their site, 15 character maximum and a restriction on some special characters. https://support.microsoft.com/en-us/kb/909264

Know what platform you're deploying to

In order to support both physical and virtual platforms I set up most task sequences with separate rules to accommodate physical and virtual machines.

Separate task sequence steps are used based on the target platform 

Separate task sequence steps are used based on the target platform 

Physical Machines

Each Name Workstation has a different condition associated with it, for example the Name Workstation (Physical) step will only run if the system mode does not equal "Virtual Machine". 

Uses the task sequence variable %SerialNumber% as the hostname

Uses the task sequence variable %SerialNumber% as the hostname

This step only runs if the task sequence variable Model does not equal "Virtual Machine"

This step only runs if the task sequence variable Model does not equal "Virtual Machine"

For workstations I like to use only the serial number of the computer which can be accomplished by just typing %SerialNumber% into the Value: box. Most manufactures use a unique string that is fewer than 10 characters, however you should take some samples in your environment first, below is a screenshot of a home built PC that I use, I believe it is an ASRock motherboard. You can see what the serial number of a machine is by opening a PowerShell prompt and typing "Get-WMIObject Win32_BIOS"

On a home built system the serial number is not populated

On a home built system the serial number is not populated

VMWare Virtual Machines

VMWare VMs are a different beast, they have very long serial numbers that contain spaces. See example below

Because of the long serial number what I like to do is just take the last two characters and prefix it with "VM-" (obviously this gives you less entropy, but I haven't found the need to image many VMWare machines yet). You'll see in the screenshot below you can do some basic string manipulation using VB script syntax, we're taking the right most two characters from the %SerialNumber% task sequence variable, then adding "VM-" to the beginning.

To ensure this step only runs on a VMWare virtual machine I use the following criteria.

TS7.png

Hyper-V Virtual Machines

Hyper-V is similar to VMWare where the serial number is going to be long, however the format is a bit easier to work with.

Hyper-V serial numbers are 32 character string with dashes

Hyper-V serial numbers are 32 character string with dashes

For Hyper-V I take the rightmost 8 characters of the serial number and prefix that with "VM-"

In order to ensure this only runs on the Hyper-V platform I use the following conditions

Final Thoughts

There are many ways to accomplish the task when you're working with computers. Hopefully these examples put you on the right track for a task sequence that can accommodate your needs. Comment on this if you know a better way of doing it, I'd like to hear how others are accomplishing this.

Remove all Configuration Manager direct membership rules.

I was working in Configuration Manager and for better or worse I have some collections that require me to populate them manually using direct membership rules. I know that this is not the best practice and that query rules are far superior. However the direct membership rules were a quick solution to the task at hand. I use the Now Micro Right Click Tools to do the collection population.

At some point in the future I found that my original set of devices needed to be refreshed, some devices needed to be removed and some needed to be added. I had an easy way of populating the collection with a massive set of new devices, but my only option to remove devices was to view each membership in the tiny window that you're given when you go to the properties of the collection. Since I knew I would be doing this more than 10 times (which I use as a rough rule to determine when it is time to script/automate something) I decided that there must be a better way. Since I'm already able to easily add members I just needed a way to clear out all of the current.

I did a bit of research and had found a few others who have written scripts to accomplish the same task, however they were using all WMI calls directly to the SMS Provider on the Configuration Manager servers, I wanted something that used the Configuration Manager module that is provided as part of the product. So set out to write a script which actually ended up not taking too much time. If you end up using this script be advised that my PowerShell probably does not follow best practices and should not be used as an example of how to write good scripts.

You should be able to copy and past the following script blog into you're favorite PowerShell script editor. I use the built in PowerShell ISE.

#********************************************************************************#

#
# Script Name: Remove-CMDirectMemberShip.ps1
# Version: 1.0
# Author: Dan Letsinger
# Inception Date: 6/22/2014
#
# Description:I needed a quick way to remove all of the direct memberships of a
# collection in Configuration Manager.
#
#********************************************************************************#
#
# You need to import the Configuration Manager module first in order to connect
# to the Configuration Manager site and run commands. This module is installed
# when you install the Configuration Manager console.
#
Import-Module "C:\Program Files (x86)\Microsoft Configuration Manager\AdminConsole\bin\ConfigurationManager.psd1"
#
# Enter the site code of the SCCM site that you are connecting to followed by a
# colon. I've noticed that most organizations have named their Central Admin
# Site CAS: so I've put that as the default.
#
Set-Location CAS:
#
# Enter the collection ID of the collection you need to remove all of the direct 
# memberhips from. You can add the collection ID as a column in the Configuration
# Manager console.
#
$CollectionID = "CAS00135"
#
# Add all of the direct memberships to the $Rules variable. Select only rules
# that are direct membership rules (as opposed to a query or other type of rule)
#
$Rules = (Get-CMDeviceCollection -CollectionId $CollectionID).CollectionRules | Where-Object {$_.OverridingObjectClass -eq "SMS_CollectionRuleDirect"}
#
# Loop through each rule that was detected and remove it
#
Foreach ($Rule in $Rules)
{
Remove-CMDeviceCollectionDirectMembershipRule -CollectionId $CollectionID -ResourceId $Rule.ResourceID -Force
}
#
# End
#********************************************************************************#