I experienced this on a Surface Pro 3, in every other case where I’ve tried to encrypt a system drive with BitLocker I was able to do so without issues. I’m not sure if I ran into this because of the hardware or if it was just bad luck. Anyway, I went though the entire process of updating the TPM firmware only to continue to see the issue. I’ll walk you though the error, what I did to fix it, and updating the TPM firmware on a Surface Pro 3 (which might have been necessary, or maybe not.. I’ll never know).
The Issue
After installing Windows 10 from a USB key I went to enable BitLocker. To do this I right click on the C: drive and choose “Turn On BitLocker”. After a brief loading bar I see the message:
“This PC doesn’t support entering a BitLocker recovery password during startup. Ask your administrator to configure Windows Recovery Environment so that you can use BitLocker.”

The only option is to click cancel.
The Fix
I searched around the internet and finally came across the command to configure the Windows Recovery Environment. I didn’t note down which website I originally found this, but several forums recommended this. Open a command prompt as an administrator and type:
reagentc.exe /enable
After the command ran successfully, which was almost instantly, I was able to proceed to encrypt my system drive using BitLocker.
Now… that isn’t the whole story. You see, between experiencing the issue and running the reagentc.exe command I noticed that my TPM firmware was out of date which I thought was the source of my problems. Continue reading to see how I updated the TPM firmware.
Updating the TPM firmware on a Surface Pro 3
I’m not sure which iteration of Windows 10 included the “Security Processor” menu, in previous versions of Windows your only option for managing the TPM was using tpm.msc. Typing TPM into the start menu brings up the option to view the Security Processor, which must be the new lingo for TPM in Windows 10.

Clicking the Security Processor menu tells me two things
Device health attestation isn’t supported on this device.
A firmware update is needed for your security processor (TPM)

I clicked the “Clear TPM” button which removed the error message about health attestation, but the firmware update message persisted. A web search for “Surface Pro 3 TPM Update” brought me here - https://support.microsoft.com/en-us/help/4100374/surface-pro-3-trusted-platform-module-tpm-update-tool. The site has good instructions for updating the TPM. You should heed the warning about backing up your system if you choose to go though with this, messing up your TPM is no joke, if your machine is currently encrypted using the TPM as a protector you could potentially lock your self out.
Per the instructions on the Microsoft page, I downloaded and installed the Surface Pro 3 TPM Update Tool. I never understood why Microsoft gives links to downloads, then makes you pick which thing you want to download, this was one of those situations, I picked “Microsoft_Surface_Pro_3_Tpm_Update_Tool_Setup.msi”

This installed something on my computer called the “Microsoft Surface Pro 3 TPM Update Tool”, which I found in the start menu. Microsoft recommends using a USB 3.0 drive with at least 0.5 GB of space, thankfully I had one laying around. This does format the USB drive and erases all data on the drive.

There were a few more screens in the update tool before it finally completed.

Here is a screen shot of tpm.msc prior to updating the TPM. Note the Manufacturer Version: 5.0.1089.2

Now for the annoying part, I had to boot into the UEFI, delete the secure boot keys, then disable secure boot. To boot into UEFI I had to power the surface off, then start it by holding Power + Volume Up.
Once there, I toggled Secure Boot to disabled and deleted all secure boot keys.
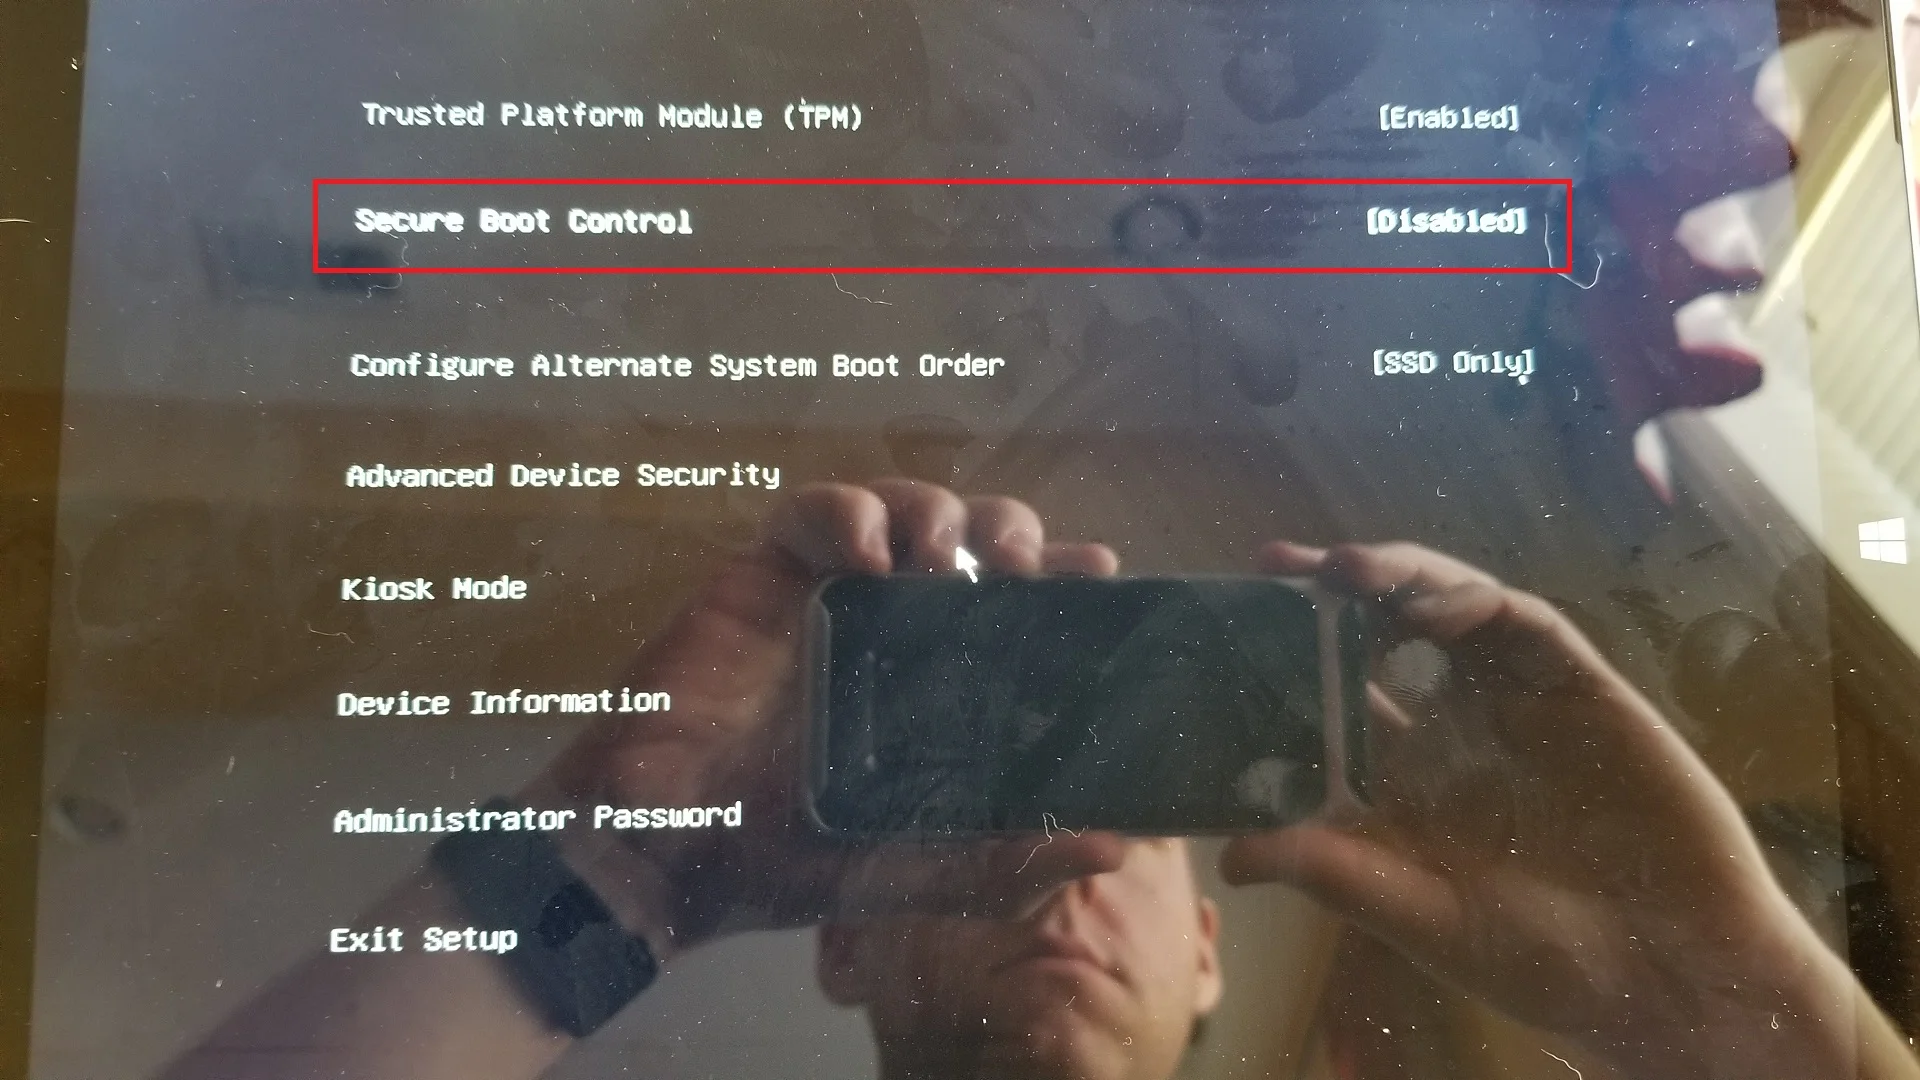
That screen sure is dusty.
After doing that, I clicked Exit Setup; I was prompted to save the config, then the machine restarted into Windows. Now, the instructions say to power off the surface, and insert the USB key. This time to boot off the USB key I had to hold Power + Volume Down. When secure boot is disabled, the surface boots with a red screen. It reminds me of the old Doom SNES cartridge.

I don’t recall if the firmware update started automatically after booting off the USB key, or if I had to click enter, but the firmware update was quick.

At this point, the instructions say to boot into Windows and run tpm.msc to verify the TPM is in the “Ready for use.” status, mine was.
I checked my TPM version at this point and saw it was updated to the newer version 5.62.3126.2

I checked the Security Processor and saw that all of the errors were gone.

Finally, I had to boot back into UEFI (Power + Volume Up) to re-enable secure boot and re-install all of the factory default keys.
Even after all of that I wasn’t able to enable BitLocker until I ran the reagentc.exe /enable command.
What did I learn?
Sometimes you think you know how to fix something because it seems obvious to you, only to find out that you’re not as smart as you think you are.